Connecting to a Database
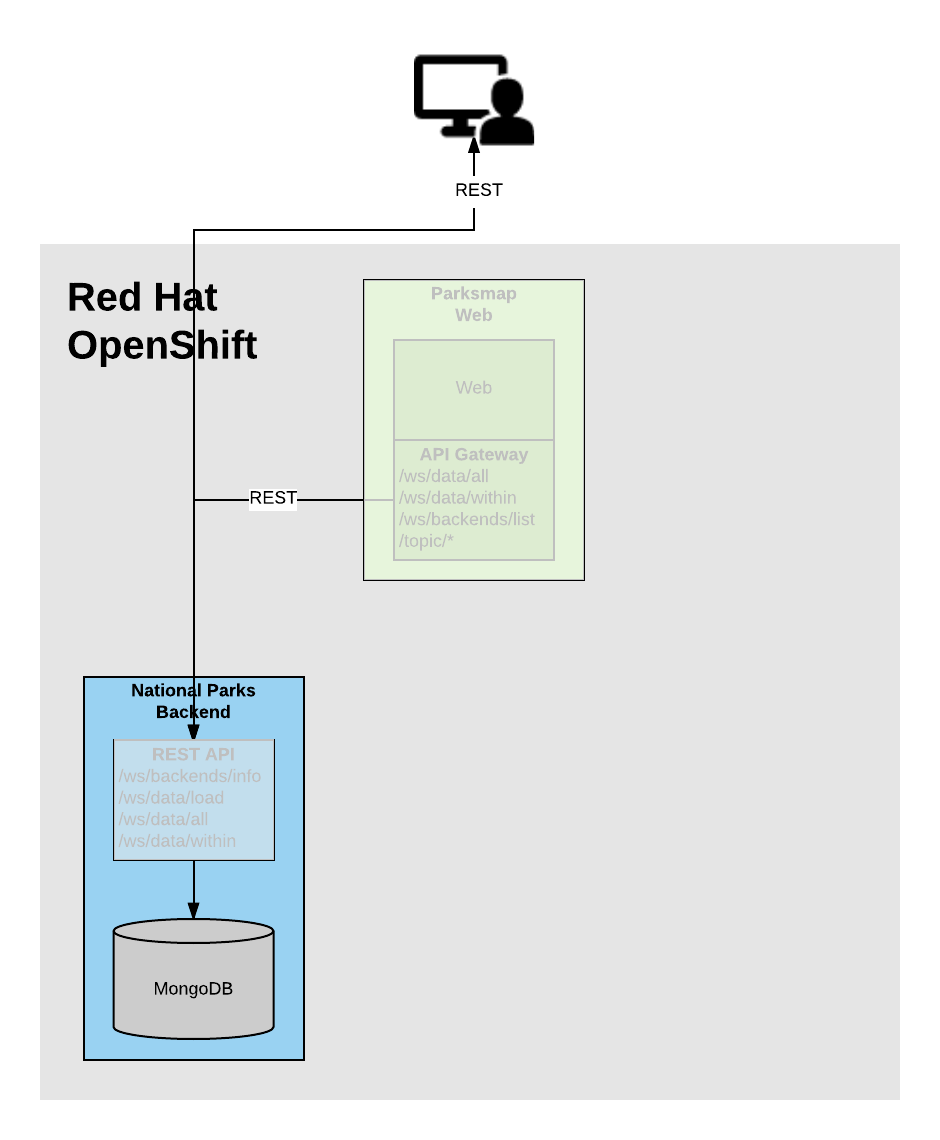
In this section we will deploy and connect a MongoDB database where the
nationalparks application will store location information.
Finally, we will mark the nationalparks application as a backend for the map
visualization tool, so that it can be dynamically discovered by the parksmap
component using the OpenShift discovery mechanism and the map will be displayed
automatically.
Background: Storage
Most useful applications are "stateful" or "dynamic" in some way, and this is
usually achieved with a database or other data storage. In this lab we are
going to add MongoDB to our nationalparks application and then rewire it to
talk to the database using environment variables via a secret.
We are going to use the MongoDB image that is included with OpenShift.
By default, this will use EmptyDir for data storage, which means if the Pod disappears the data does as well. In a real application you would use OpenShift’s persistent storage mechanism to attach real-world storage (NFS, Ceph, EBS, iSCSI, etc) to the Pods to give them a persistent place to store their data.
Background: Templates
In this module we will create MongoDB from a Template, which is useful mechanism in OpenShift to define parameters for certain values, such as DB username or password, that can be automatically generated by OpenShift at processing time.
Administrators can load Templates into OpenShift and make them available to all users. Users can create Templates and load them into their own Projects for other users (with access) to share and use.
The great thing about Templates is that they can speed up the deployment workflow for application development by providing a "recipe" of sorts that can be deployed with a single command. Not only that, they can be loaded into OpenShift from an external URL, which will allow you to keep your templates in a version control system.
Exercise: Create a MongoDB Template
In this step we will create a MongoDB template inside our project, so that is only visible to our user and we can access it from Developer Perspective to create a MongoDB instance.
oc create -f https://raw.githubusercontent.com/openshift-labs/starter-guides/ocp-4.6/mongodb-template.yaml -n workshopWhat just happened? What did you just create? The item that we passed to the create
command is a Template. create simply makes the template available in
your Project.
Exercise: Deploy MongoDB
As you’ve seen so far, the web console makes it very easy to deploy things onto OpenShift. When we deploy the database, we pass in some values for configuration. These values are used to set the username, password, and name of the database.
The database image is built in a way that it will automatically configure itself using the supplied information (assuming there is no data already present in the persistent storage!). The image will ensure that:
-
A database exists with the specified name
-
A user exists with the specified name
-
The user can access the specified database with the specified password
In the Developer Perspective in your workshop project,
click +Add and then Database. In the Databases view, you can click Mongo to filter for just MongoDB.
| Make sure to uncheck Operator Backed option from Type section |
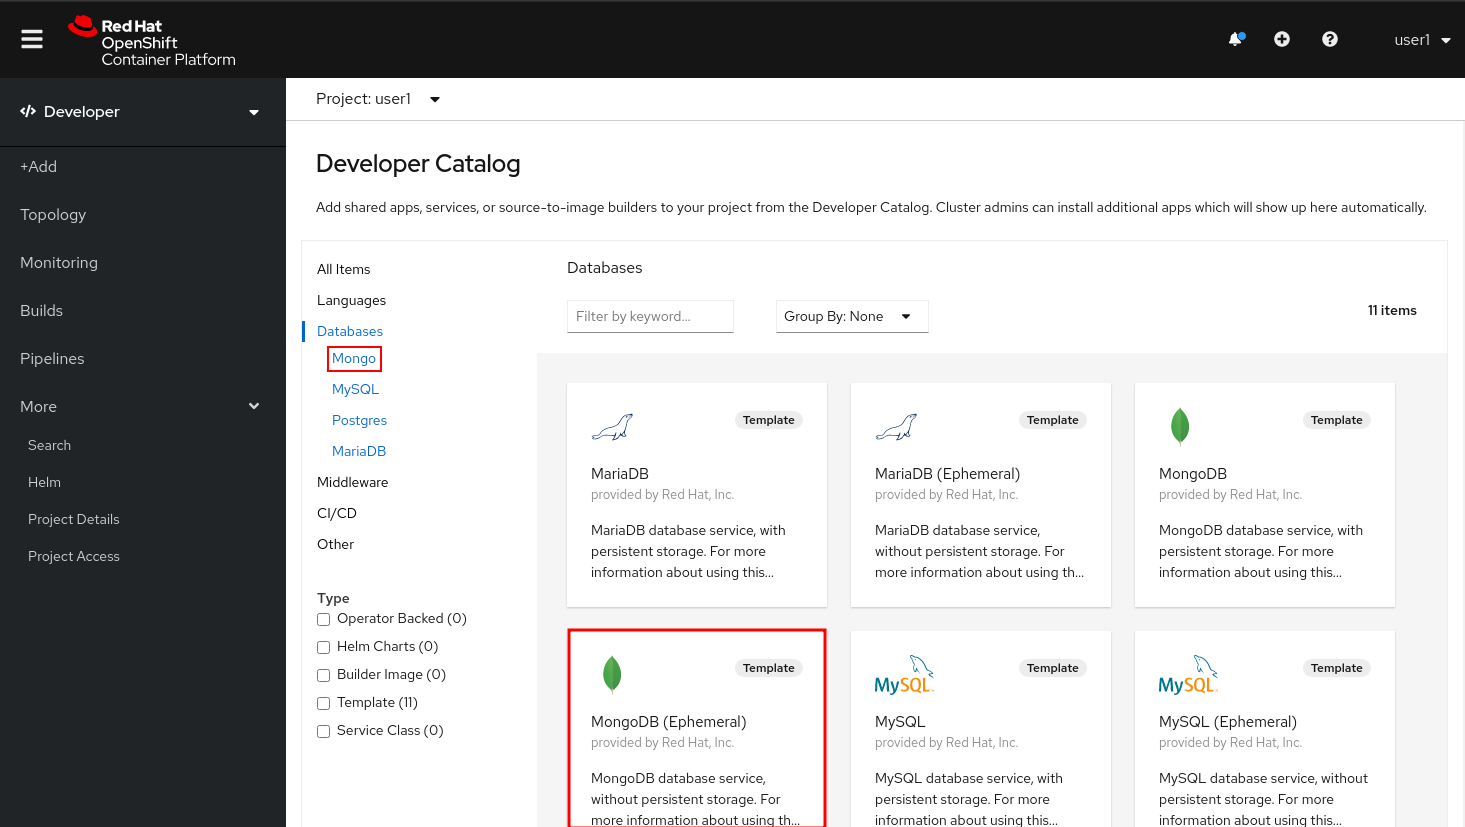
Alternatively, you could type mongodb in the search box. Once you have drilled down to see MongoDB, find the MongoDB (Ephemeral) template and select it. You will notice that there are multiple
MongoDB templates available. We do not need a database with persistent storage, so the ephemeral Mongo
template is what you should choose. Go ahead and select the ephemeral template and click the Instantiate Template button.
When we performed the application build, there was no template. Rather, we selected the builder image directly and OpenShift presented only the standard build workflow. Now we are using a template - a preconfigured set of resources that includes parameters that can be customized. In our case, the parameters we are concerned with are — user, password, database, and admin password.
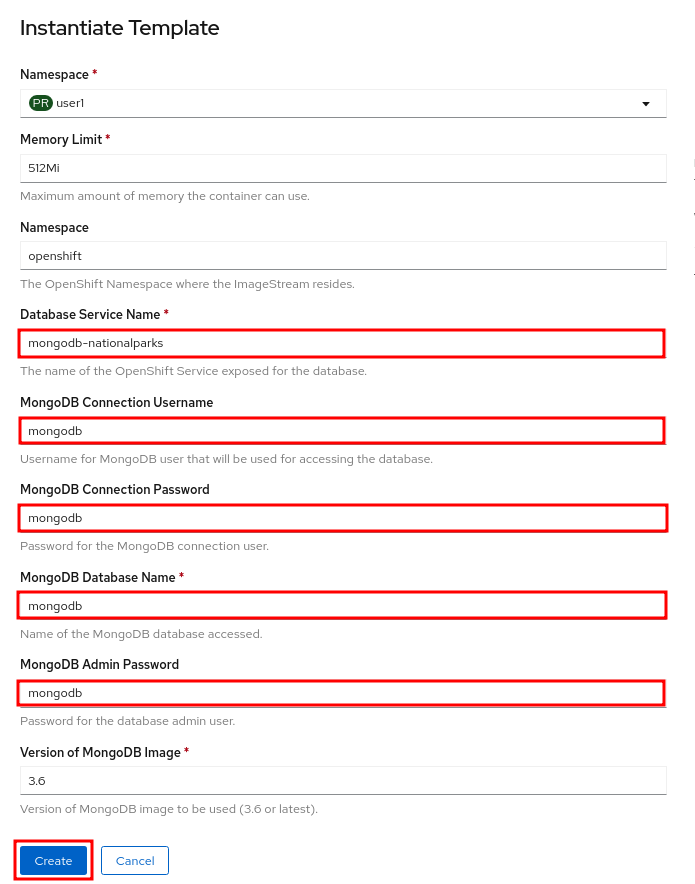
| Make sure you name your database service name mongodb-nationalparks |
You can see that some of the fields say "generated if empty". This is a feature of Templates in OpenShift. For now, be sure to use the following values in their respective fields:
-
Database Service Name:mongodb-nationalparks -
MongoDB Connection Username:mongodb -
MongoDB Connection Password:mongodb -
MongoDB Database Name:mongodb -
MongoDB Admin Password:mongodb
Make sure to have configured the MongoDB Database Name parameter with the appropriate value as by default it will already have a value of sampledb.
|
Once you have entered in the above information, click on Create to go to the next step which will allow us to add a binding.
From left-side menu, click to Secrets.
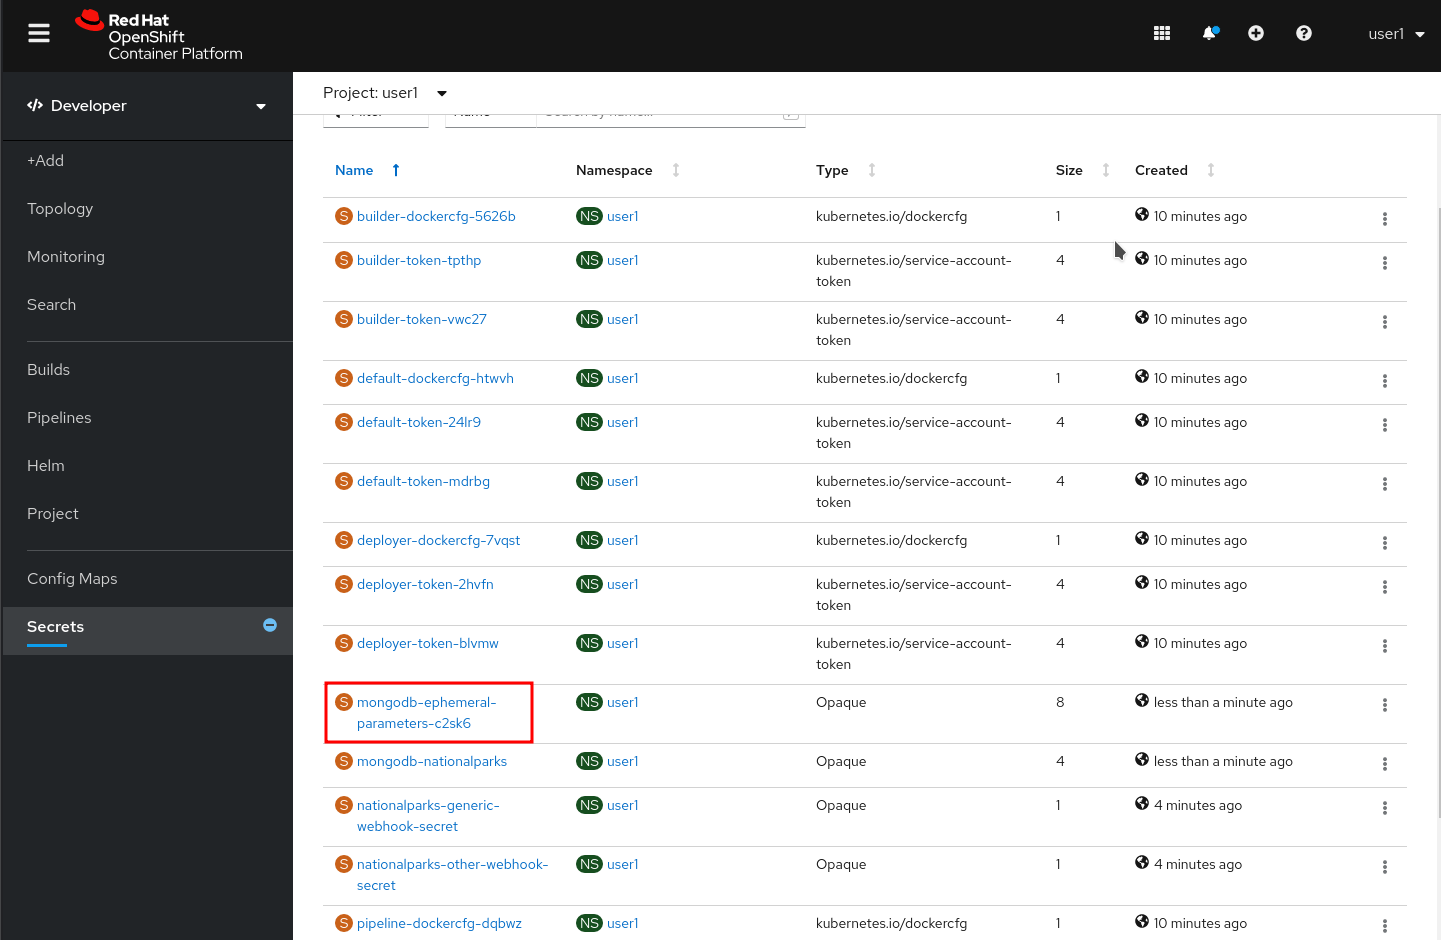
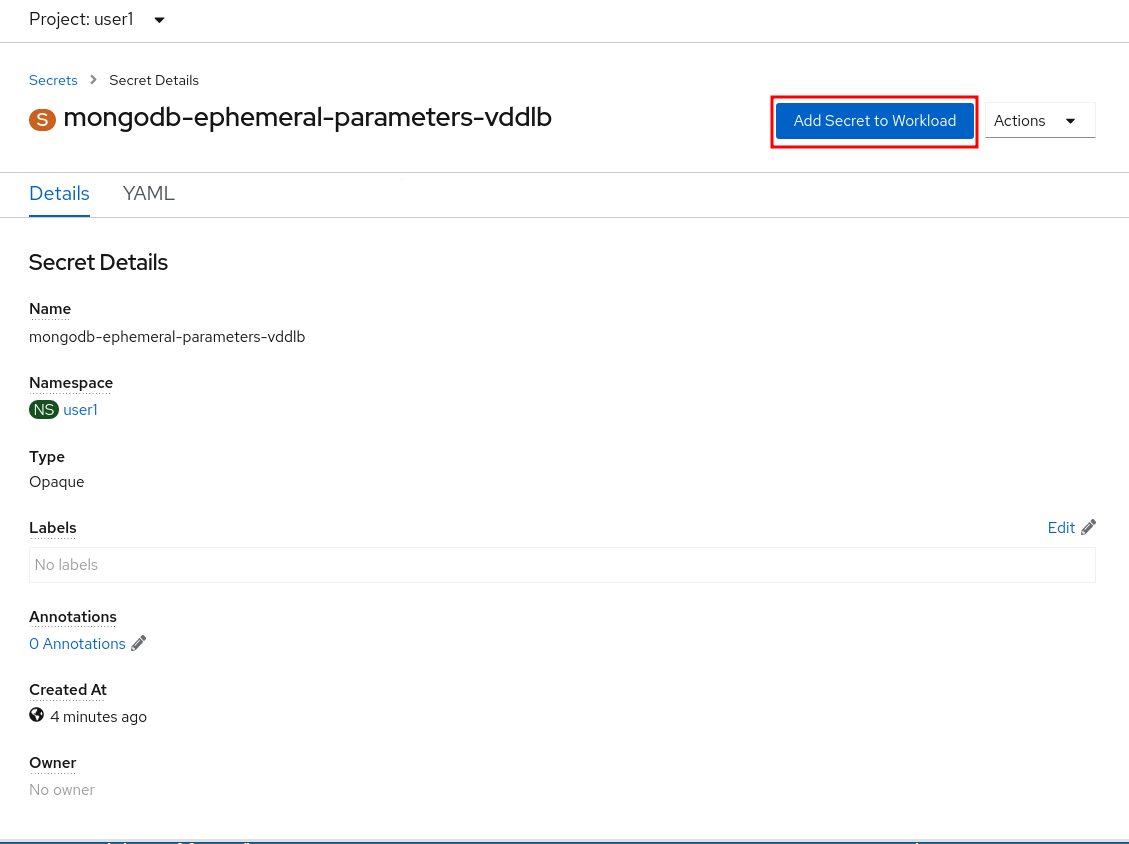
Click the secret name listed that we will use for Parameters. The secret can be used in other components, such as the nationalparks backend, to authenticate to the database.
Now that the connection and authentication information stored in a secret in our project, we need to add it to the nationalparks backend. Click the Add Secret to Workload button.
Select the nationalparks workload and click Save.
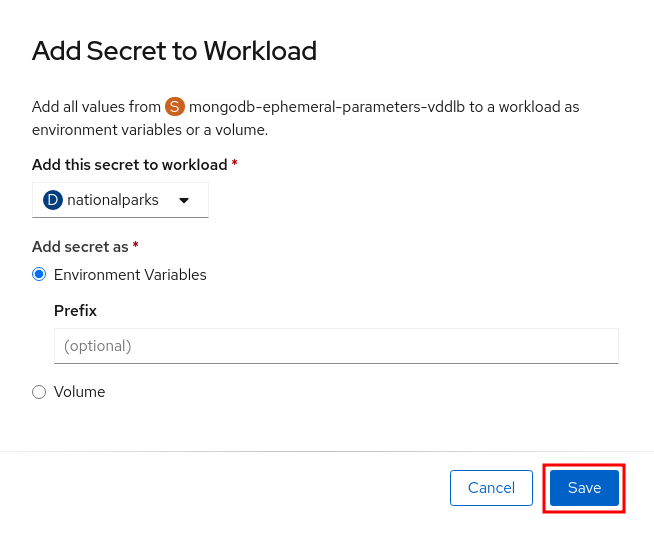
This change in configuration will trigger a new deployment of the nationalparks application with the environment variables properly injected.
|
Back in the Topology view, if your 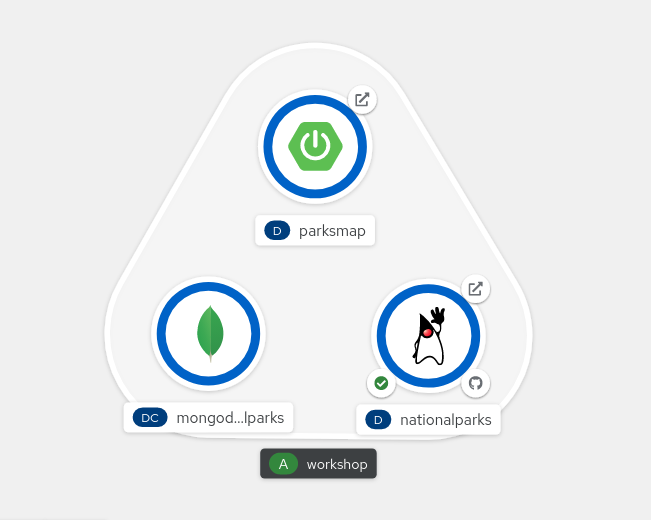
|
Next, let’s fix the labels assigned to the mongodb-nationalparks deployment. Currently, we cannot set labels when using the database template from the catalog, so we will fix these labels manually.
Like before, we’ll add 3 labels:
The name of the Application group:
app=workshopNext the name of this deployment.
component=nationalparksAnd finally, the role this component plays in the overall application.
role=databaseExecute the following command:
oc label dc/mongodb-nationalparks svc/mongodb-nationalparks app=workshop component=nationalparks role=database --overwriteExercise: Exploring OpenShift Magic
As soon as we attached the Secret to the Deployment, some
magic happened. OpenShift decided that this was a significant enough change to
warrant updating the internal version number of the ReplicaSet. You
can verify this by looking at the output of oc get rs:
NAME                       DESIRED   CURRENT   READY   AGE
nationalparks-58bd4758fc   0         0         0       4m58s
nationalparks-7445576cd9   0         0         0       6m42s
nationalparks-789c6bc4f4   1         1         1       41s
parksmap-57df75c46d        1         1         1       8m24s
parksmap-65c4f8b676        0         0         0       18m
We see that the DESIRED and CURRENT number of instances for the current deployment. The desired and current number of the other instances are 0. This means that OpenShift has gracefully torn down our "old" application and stood up a "new" instance.
Exercise: Data, Data, Everywhere
Now that we have a database deployed, we can again visit the nationalparks web
service to query for data:
http://nationalparks-workshop.%CLUSTER_SUBDOMAIN%/ws/data/allAnd the result?
[]Where’s the data? Think about the process you went through. You deployed the application and then deployed the database. Nothing actually loaded anything INTO the database, though.
The application provides an endpoint to do just that:
http://nationalparks-workshop.%CLUSTER_SUBDOMAIN%/ws/data/loadAnd the result?
Items inserted in database: 2893If you then go back to /ws/data/all you will see tons of JSON data now.
That’s great. Our parks map should finally work!
| There are some errors reported with browsers like Firefox 54 that don’t properly parse the resulting JSON. It’s a browser problem, and the application is working properly. |
https://parksmap-workshop.%CLUSTER_SUBDOMAIN%Hmm… There’s just one thing. The main map STILL isn’t displaying the parks. That’s because the front end parks map only tries to talk to services that have the right Label.
|
You are probably wondering how the database connection magically started working? When deploying applications to OpenShift, it is always best to use environment variables, secrets, or configMaps to define connections to dependent systems. This allows for application portability across different environments. The source file that performs the connection as well as creates the database schema can be viewed here: In short summary: By referring to bindings to connect to services (like databases), it can be trivial to promote applications throughout different lifecycle environments on OpenShift without having to modify application code. |
Exercise: Working With Labels
We explored how a Label is just a key=value pair earlier when looking at Services and Routes and Selectors. In general, a Label is simply an arbitrary key=value pair. It could be anything.
-
pizza=pepperoni -
pet=dog -
openshift=awesome
In the case of the parks map, the application is actually querying the OpenShift
API and asking about the Routes and Services in the project. If any of them have a
Label that is type=parksmap-backend, the application knows to interrogate
the endpoints to look for map data.
You can see the code that does this
here.
Fortunately, the command line provides a convenient way for us to manipulate
labels. describe the nationalparks service:
oc describe route nationalparksName: nationalparks
Namespace: workshop
Created: 2 hours ago
Labels: app=workshop
app.kubernetes.io/component=nationalparks
app.kubernetes.io/instance=nationalparks
app.kubernetes.io/name=java
app.kubernetes.io/part-of=workshop
app.openshift.io/runtime=java
app.openshift.io/runtime-version=11
component=nationalparks
role=backend
Annotations: openshift.io/host.generated=true
Requested Host: nationalparks-workshop.%CLUSTER_SUBDOMAIN%
exposed on router router 2 hours ago
Path: <none>
TLS Termination: <none>
Insecure Policy: <none>
Endpoint Port: 8080-tcp
Service: nationalparks
Weight: 100 (100%)
Endpoints: 10.1.9.8:8080You see that it already has some labels. Now, use oc label:
oc label route nationalparks type=parksmap-backendYou will see something like:
route.route.openshift.io/nationalparks labeledIf you check your browser now:
https://parksmap-workshop.%CLUSTER_SUBDOMAIN%/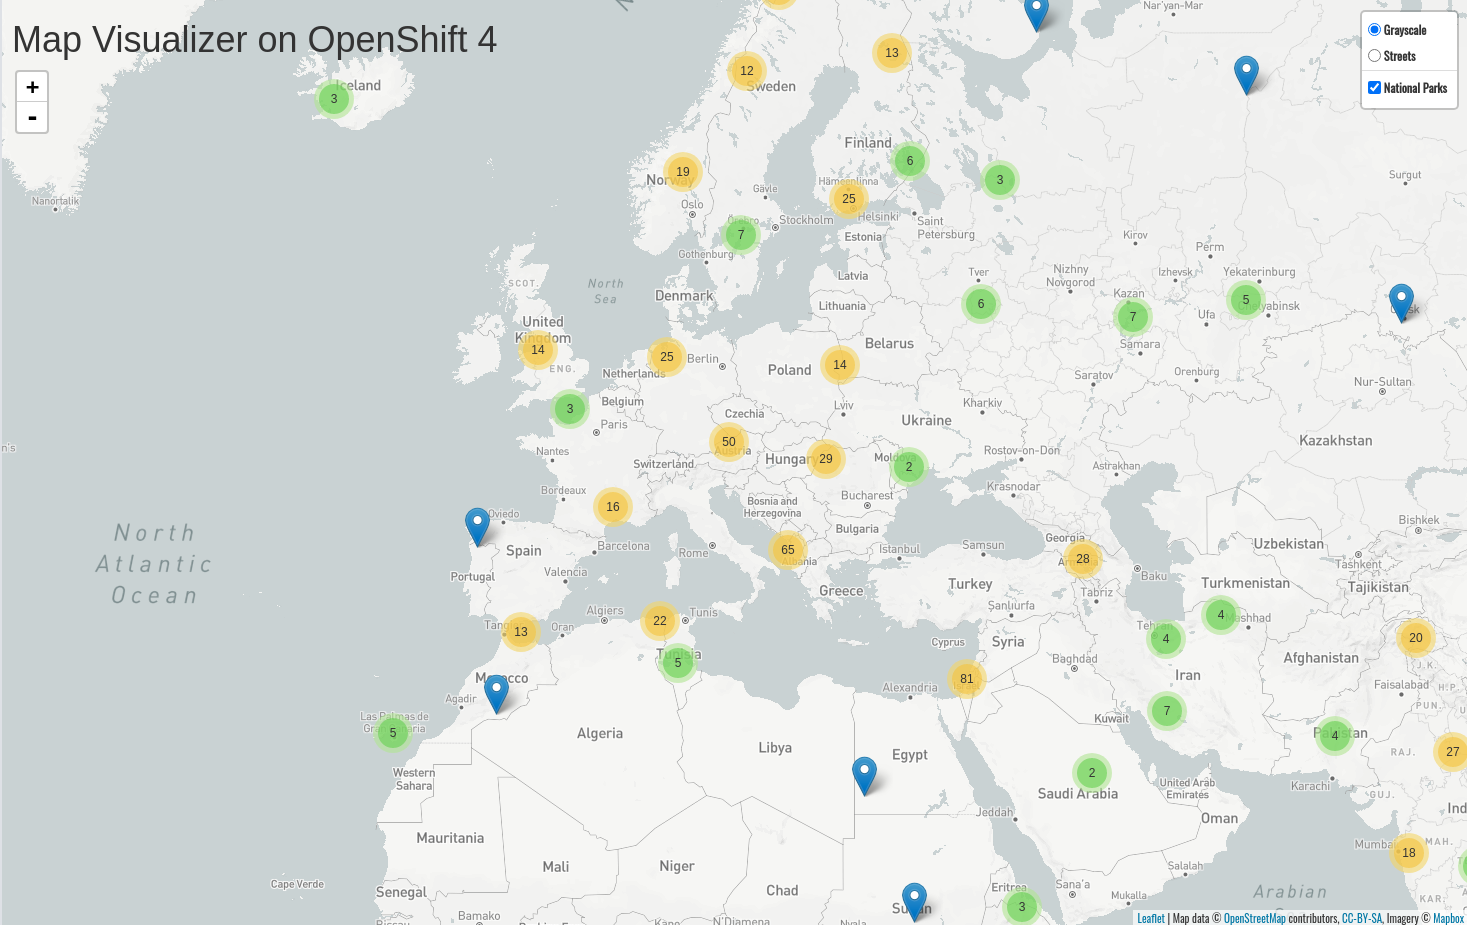
You’ll notice that the parks suddenly are showing up. That’s really cool!